CREATING 3D LOGO USING ADOBE ILLUSTRATOR
How to Create a 3D Logo: Guide and Inspirational Examples
If
you keep up with the latest trends in the logo design industry, you
probably know that 3D logos are becoming increasingly popular. Dynamic
and impactful, 3D emblems have a distinct visual edge over their
two-dimensional counterparts. In this article, we’ll break down how to
create a smart 3D logo in Adobe Illustrator. Plus, we’ve put together a
collection of beautiful 3D logos to inspire you on your creative
journey.




















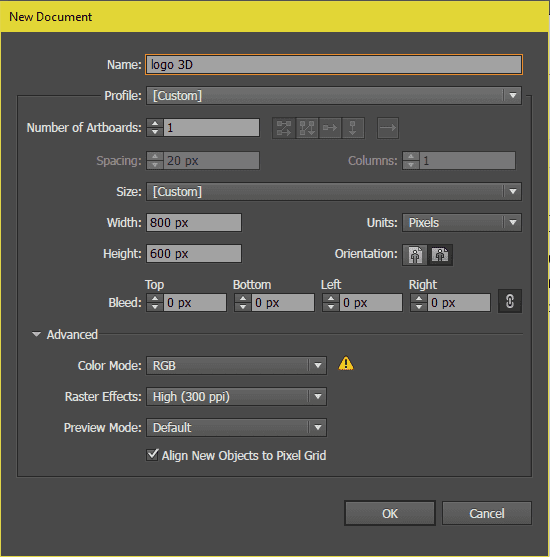
Open Adobe Illustrator and create a new document with the following parameters.
Step 2
Go to Preferences > Guides & Grid. Create a 50x50px grid with 4 subdivisions (see the settings below).

Step 3
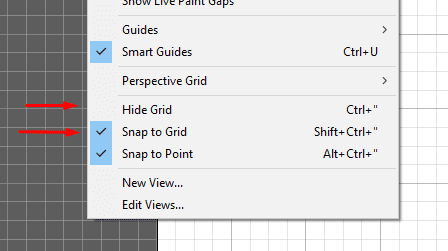
Go to the View tab and check the options View > Show grid and View > Snap to grid.
Step 1
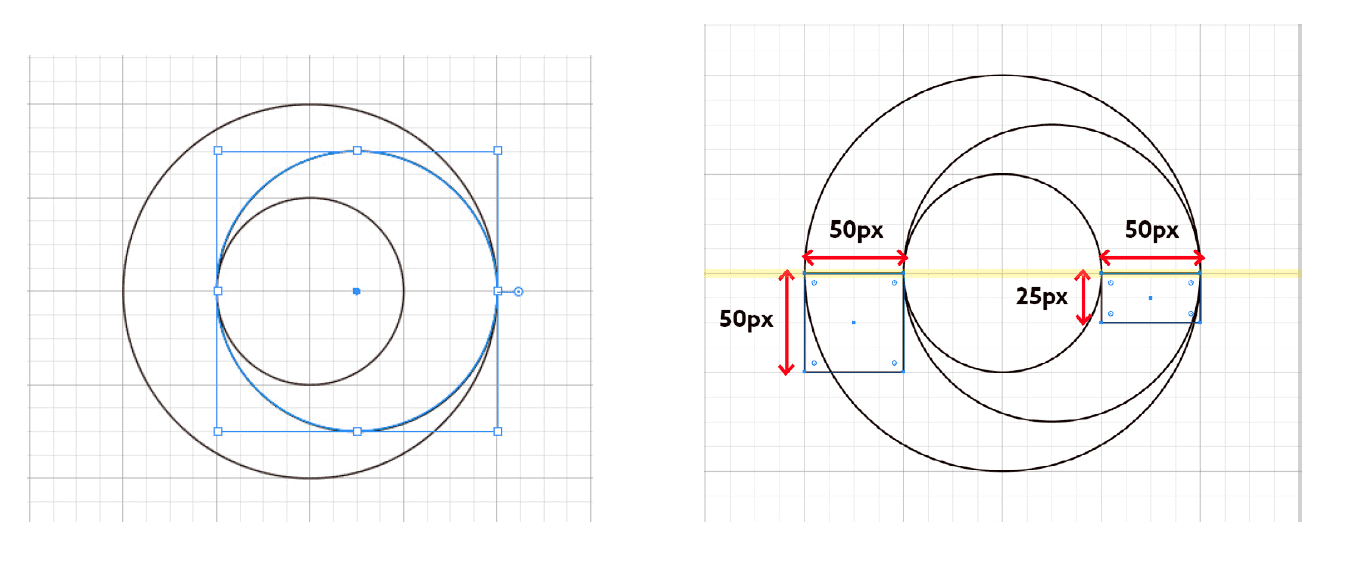
Use the Ellipse (L) tool to draw a 200x200px circle in the center of the canvas. Then draw a smaller circle (100x100px) inside the bigger one.
Step 2
Draw another circle (150x150px). Align it and the two other circles with the center. Shift the circle to the right by pressing the arrow key twice.
Draw two rectangles with sizes of 50x50px and 50x25px. Arrange them as shown in the image below.
Step 3
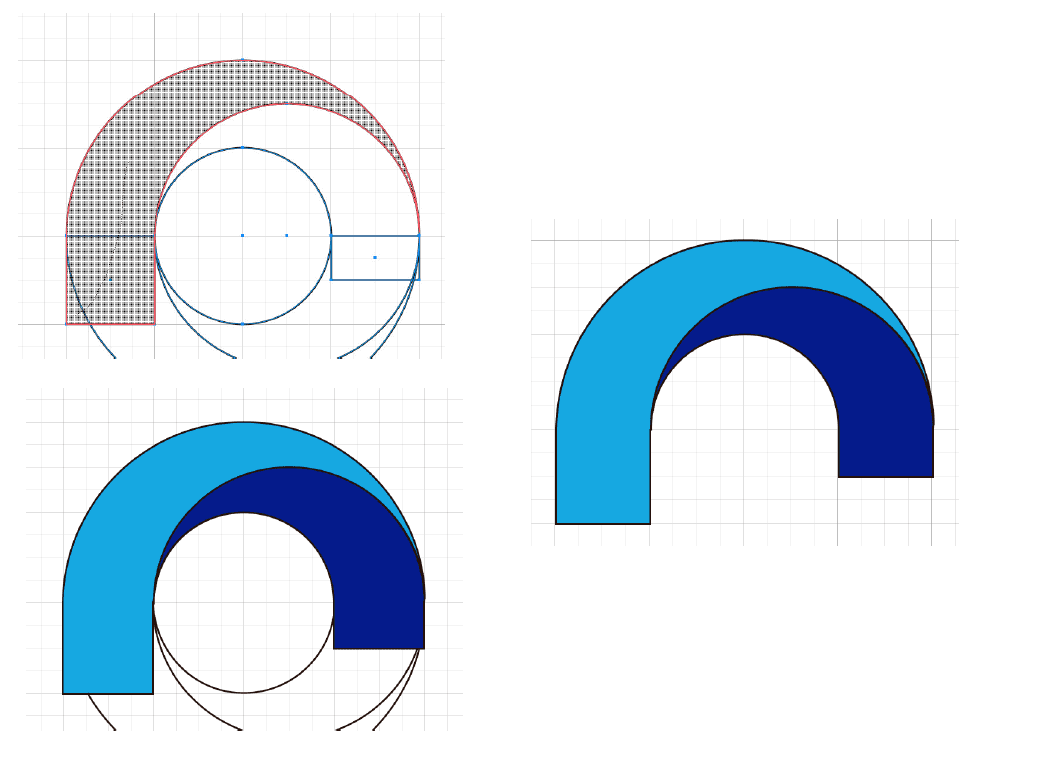
Select all the objects and combine them using the Shape Builder (Shift+M) tool. Combine the figures as shown below. You can fill the objects with colors now or later. Erase the remaining figures.
Step 4
Round the lower corners with the Direct Selection (A) tool until you get an arch. Remove stroke from the two objects.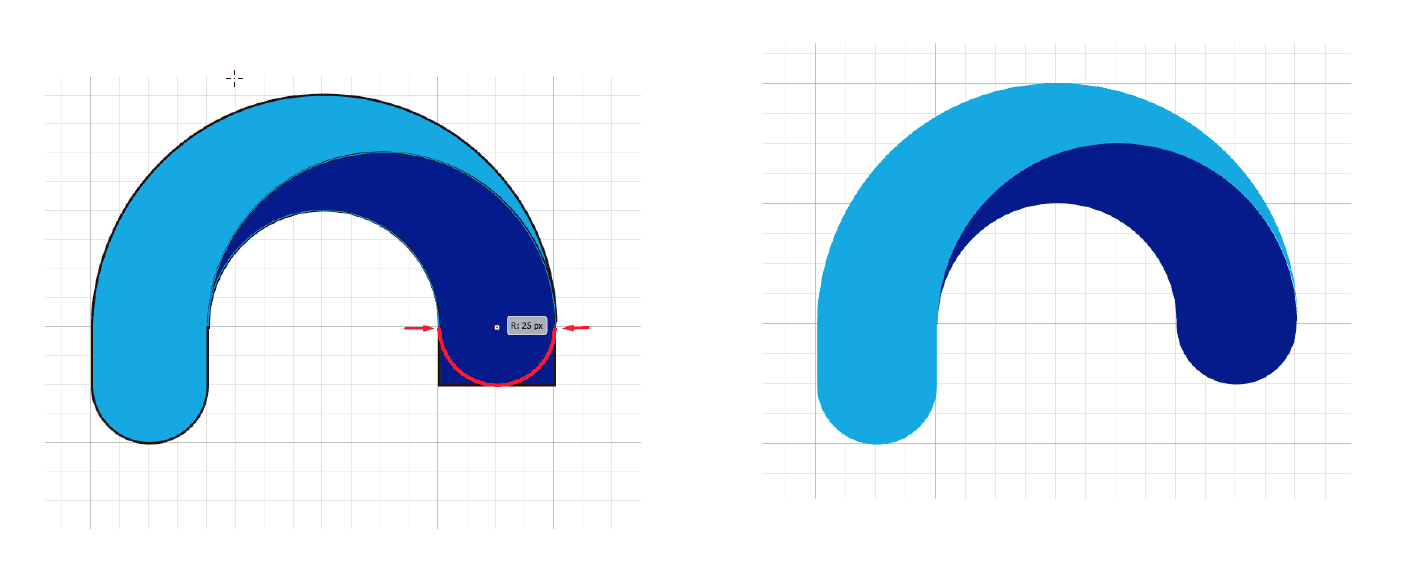
Step 1
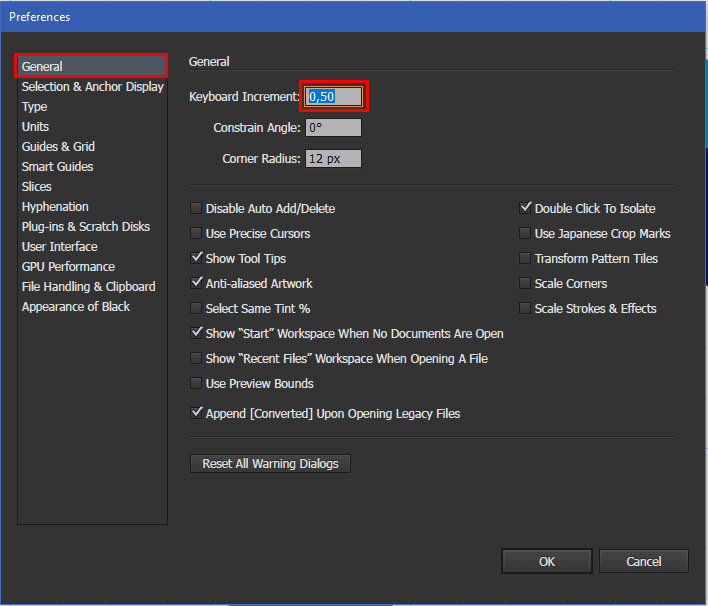
Disable a grid. Go to Preferences>General. Enter 0.50px in the Keyboard Increment field. Select the left part of the arch and shift it to the left by pressing the arrow key 10 times. Then shift the object to the back by choosing Object>Arrange>Send to back.
Copy (Ctrl+C Crtl+F) the other part of the arch and shift it to the right by pressing the arrow key 10 times. Then shift the object to the back. Use Shape Builder (Shift+M) to remove the excess part of the arch.

Step 2
Highlight the right part of the arch and shift it to the right by pressing the arrow key 10 times. Then send the object to the back. Fill the object with a darker color to distinguish it from the main figure.
Step 1
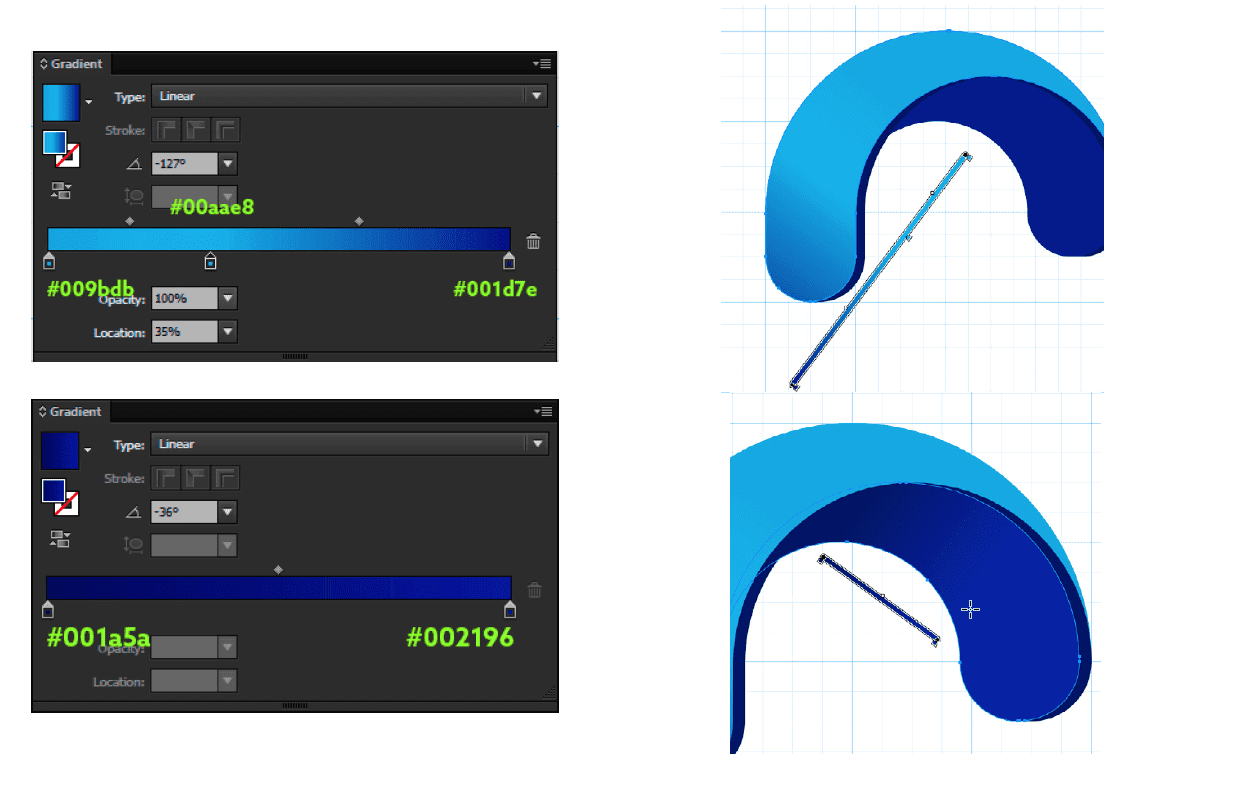
Use the Gradient (G) tool to apply a linear gradient to the left part of the arch and the back of the logo. Add another gradient to the logo’s edges.
Step 2
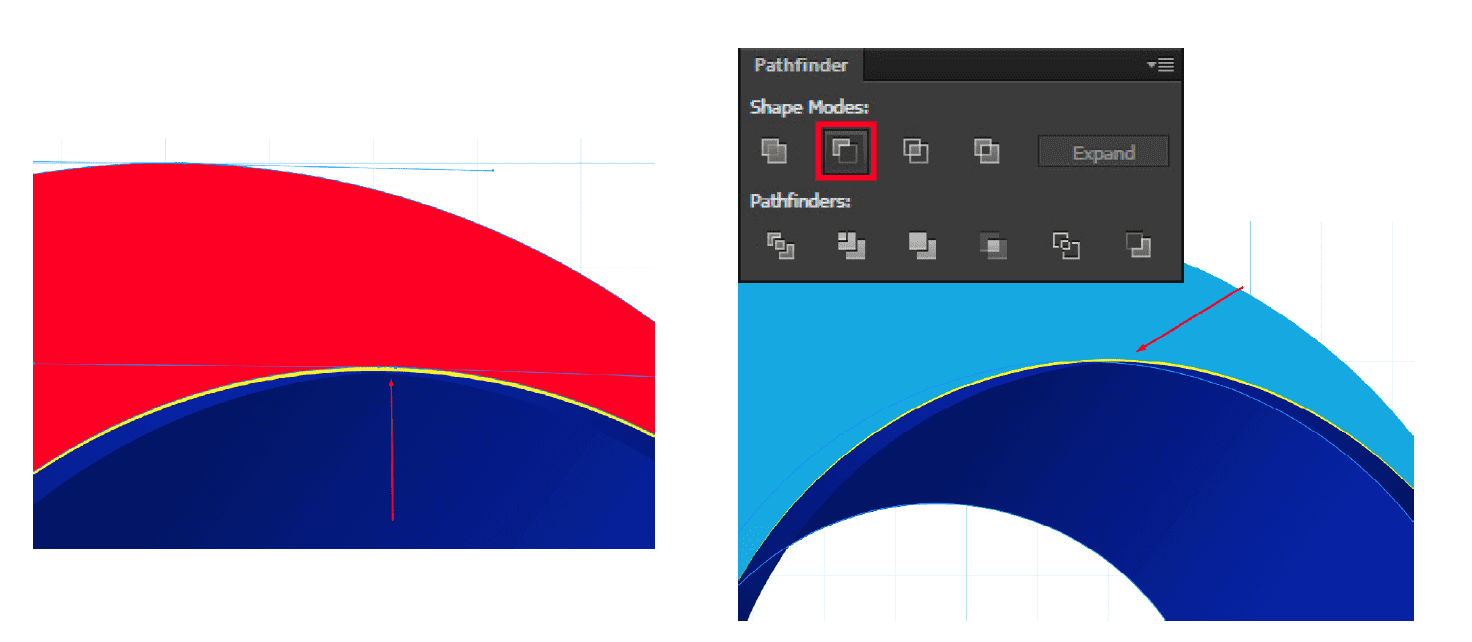
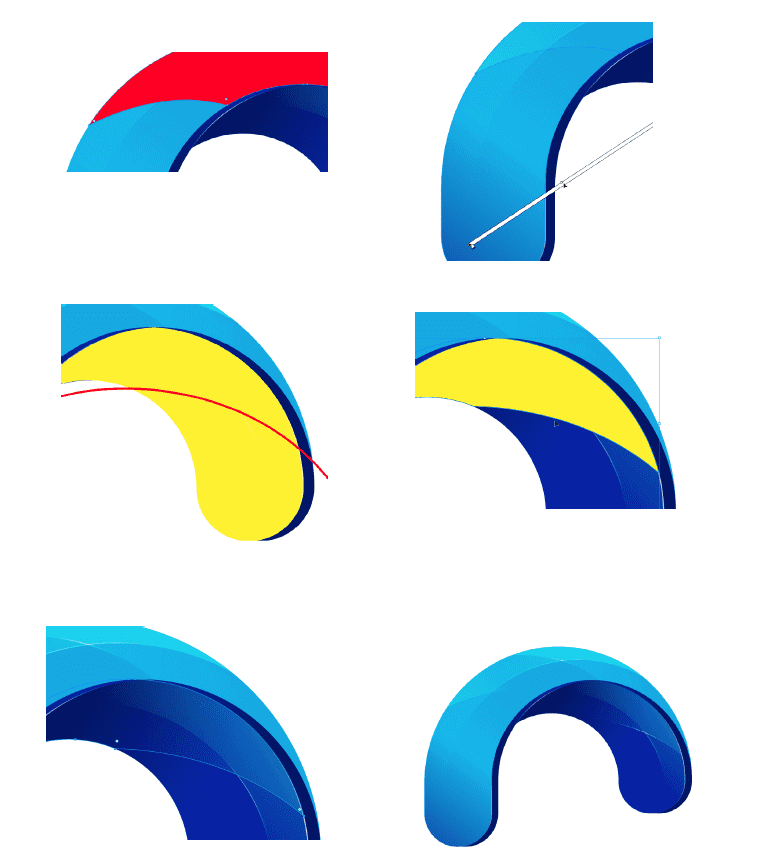
Select the upper part of the logo. Copy it (Ctrl+C Ctrl+F) and fill it with yellow color. Copy the object again and fill it with red color. Use the Direct Selection (A) tool to select a bottom point of the arch. Shift it up by pressing the arrow key once. Select the red and yellow objects and click Minus Front in the Pathfinder tab.
Step 3
Do the same with the edge to achieve a beveled effect.


Step 4
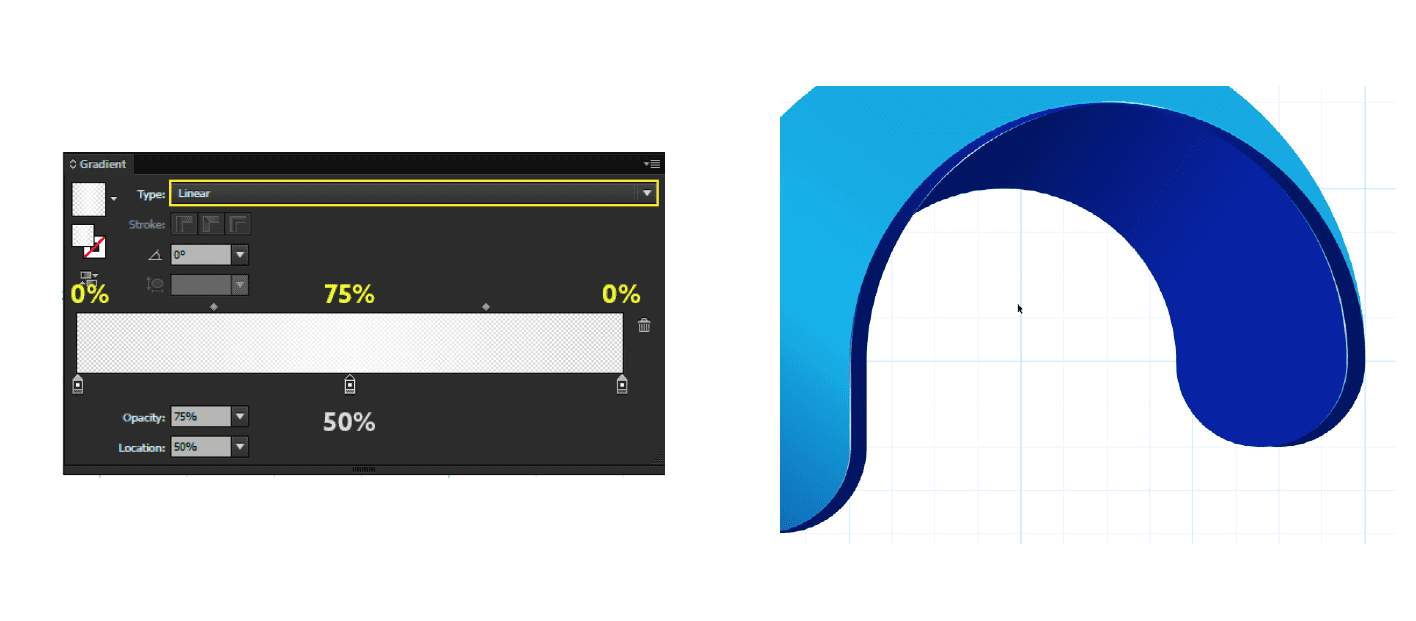
Fill the beveled edges with a transparent gradient as shown in the image below. Apply the gradient all along the bevel.
Step 1
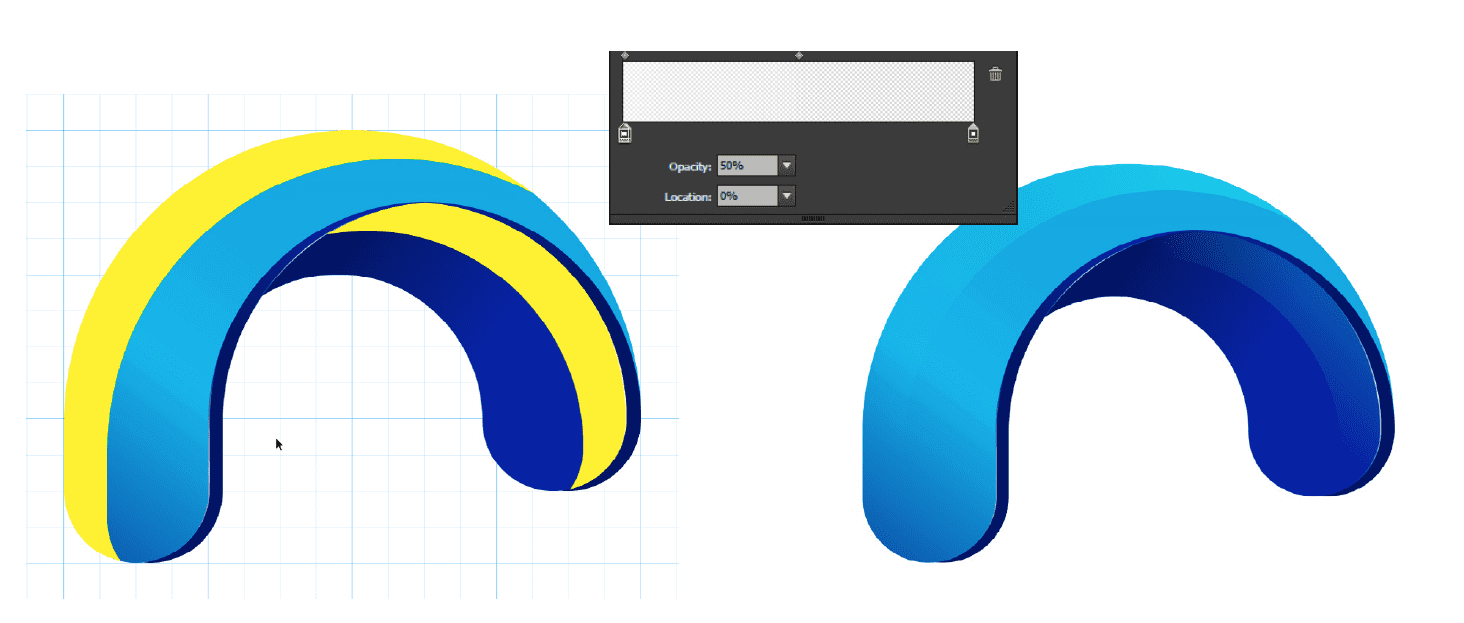
Create two copies of the upper part of the logo. Fill the new figures with red and yellow colors.
Shift the upper figure three moves to the left, keeping the Shift button pressed. Select the two figures and click Minus Front in the Pathfinder tab.
Use the Gradient (G) tool to apply a gradient from white with 50% opacity to white with 0% opacity.
Step 2
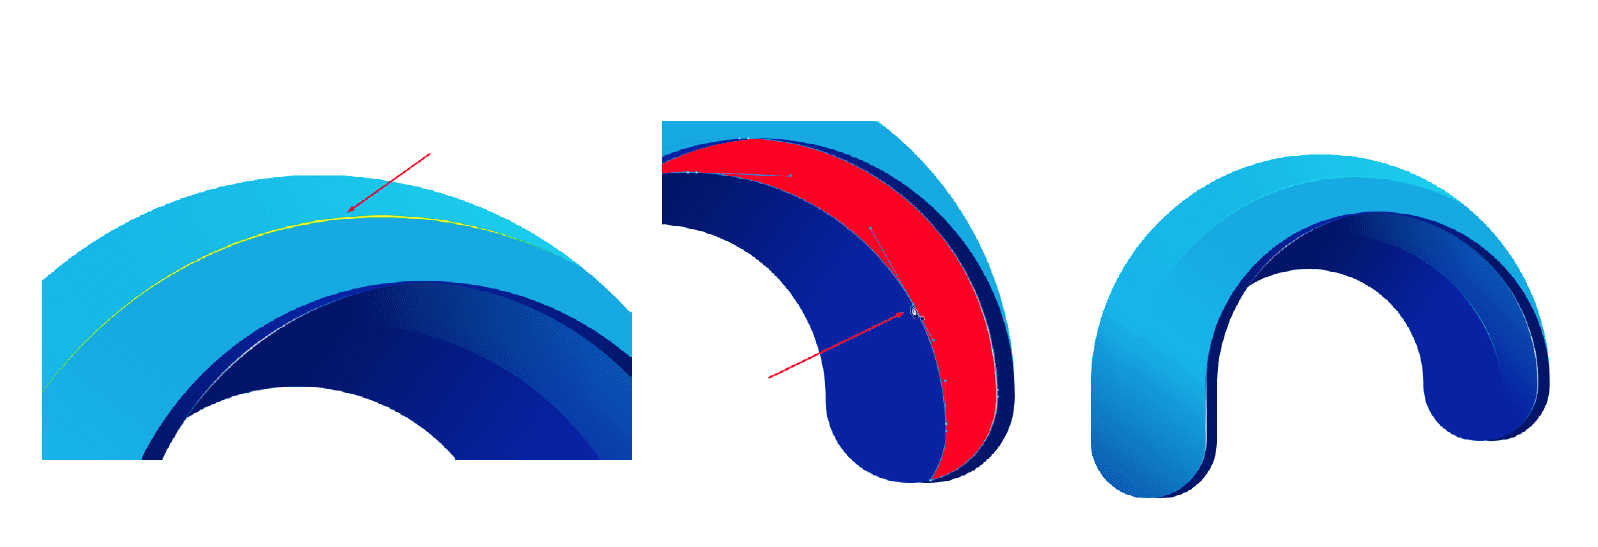
Create flares for the upper and lower parts of the logo as described in Step 1.
Step 3
Copy the upper part of the logo. Use the Pen (P) tool to draw a curve crossing the object.
Select the curve and the object. Click Divide in the Pathfinder tab. Ungroup the objects (Object>Ungroup) and remove the excess parts. Apply a white gradient with 50% opacity to the object.

Step 4
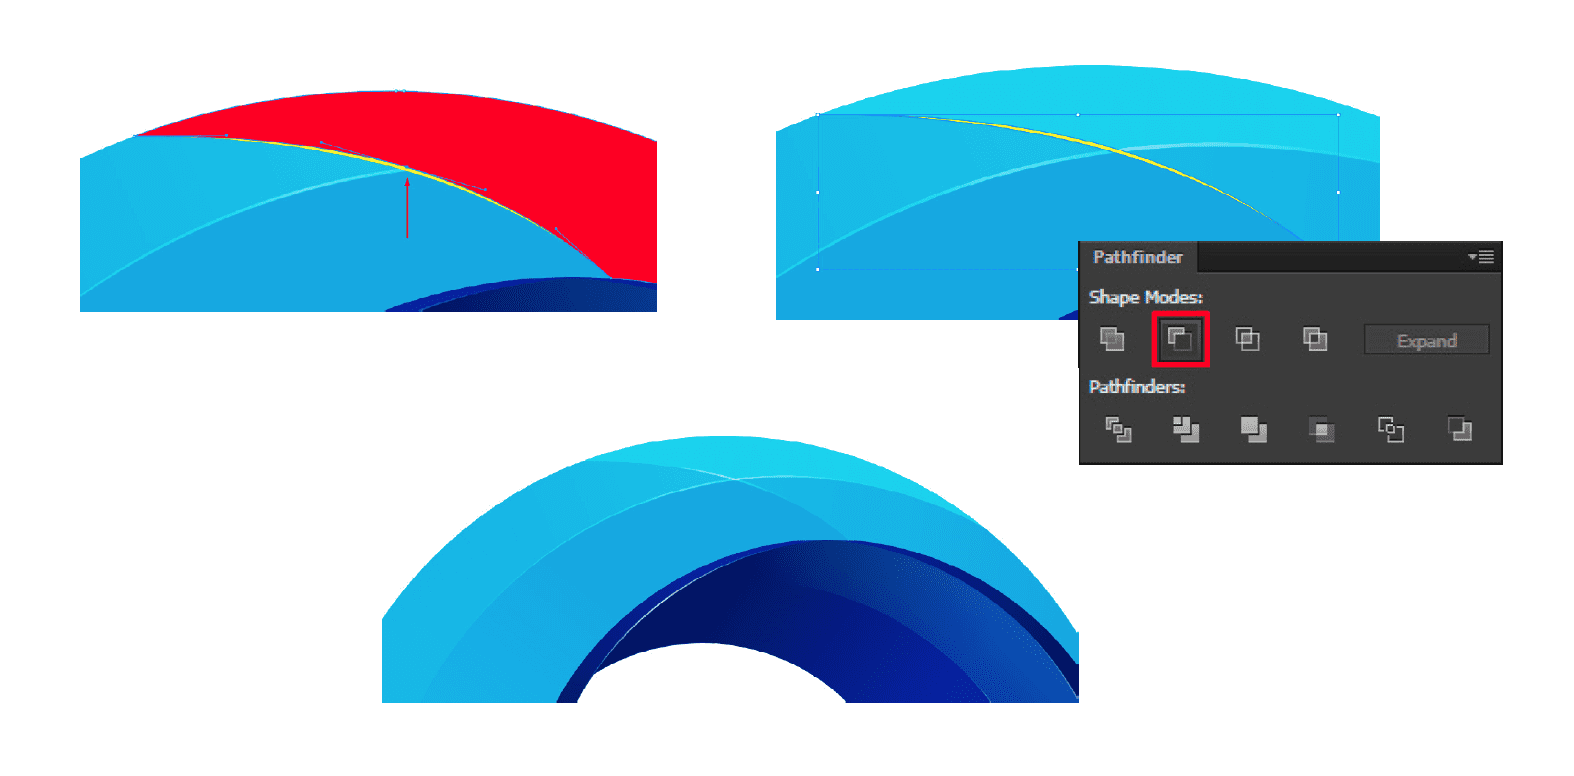
Create two copies of the object from the previous step. Fill the new objects with yellow and red colors. Use the Pen (P) tool to create an additional pivot point as shown in the image below. Shift up the point.
Click Minus Front to create a flare. Fill it with white color and apply 50% opacity.
Step 5
Repeat the steps shown below to add another reflection to the upper and lower parts of the logo.
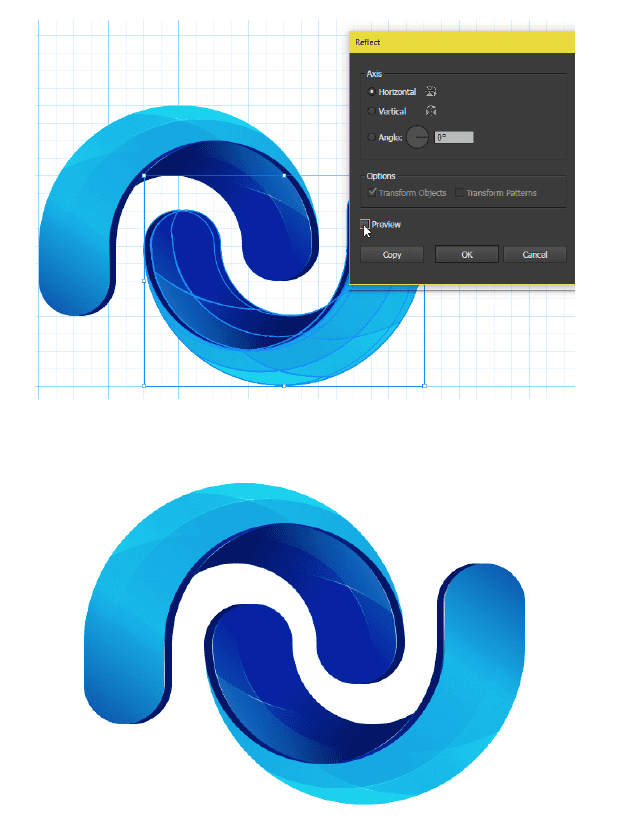
Select the entire logo and group it (Ctrl+G). Copy the group (Ctrl+F). Reflect the copy vertically and horizontally (Object>Transform>Reflect). Arrange the two groups as shown in the image below. Group all the objects.
Step 2
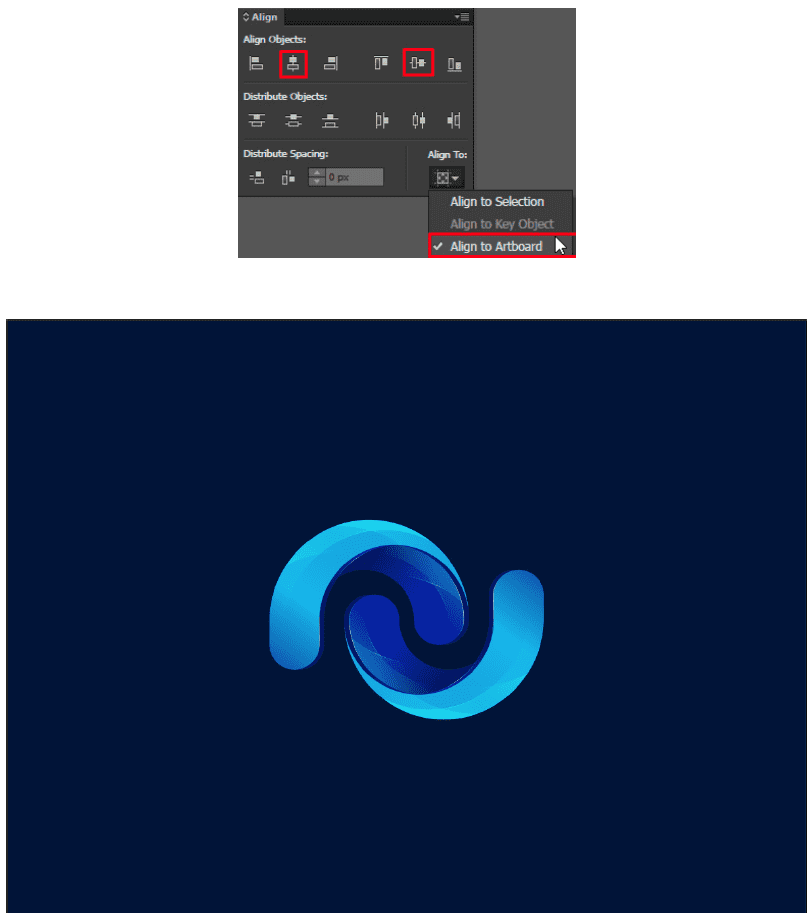
Use the Rectangle (M) tool to create a background. Draw a rectangle (800x600px) and fill it with dark blue color. Shift the rectangle to the back. Align the rectangle and the logo with the center.
3D logo collection
Check out the best 3D logos that Logaster has carefully selected for you. We bet you’ve never seen such energetic and realistic designs!


How to create a 3D logo
Ready to make a beautiful 3D logo all by yourself? This detailed tutorial will guide you through the entire design process! If you have no time to design an emblem, don’t hesitate to ask Logaster for help. Our logo maker can create a stunning 3D logo in minutes!1. Create a new document.
Step 1Open Adobe Illustrator and create a new document with the following parameters.

Step 2
Go to Preferences > Guides & Grid. Create a 50x50px grid with 4 subdivisions (see the settings below).

Step 3
Go to the View tab and check the options View > Show grid and View > Snap to grid.

2. Create geometric shapes.
In this section, we’ll draw geometric shapes that will become the cornerstones of our future design.Step 1
Use the Ellipse (L) tool to draw a 200x200px circle in the center of the canvas. Then draw a smaller circle (100x100px) inside the bigger one.

Step 2
Draw another circle (150x150px). Align it and the two other circles with the center. Shift the circle to the right by pressing the arrow key twice.
Draw two rectangles with sizes of 50x50px and 50x25px. Arrange them as shown in the image below.

Step 3
Select all the objects and combine them using the Shape Builder (Shift+M) tool. Combine the figures as shown below. You can fill the objects with colors now or later. Erase the remaining figures.

Step 4
Round the lower corners with the Direct Selection (A) tool until you get an arch. Remove stroke from the two objects.

3. Create an edge.
Now we need to create an edge that will add volume to our logo.Step 1
Disable a grid. Go to Preferences>General. Enter 0.50px in the Keyboard Increment field. Select the left part of the arch and shift it to the left by pressing the arrow key 10 times. Then shift the object to the back by choosing Object>Arrange>Send to back.
Copy (Ctrl+C Crtl+F) the other part of the arch and shift it to the right by pressing the arrow key 10 times. Then shift the object to the back. Use Shape Builder (Shift+M) to remove the excess part of the arch.


Step 2
Highlight the right part of the arch and shift it to the right by pressing the arrow key 10 times. Then send the object to the back. Fill the object with a darker color to distinguish it from the main figure.
4. Add gradients and transparency.
To add a magical 3D effect, apply gradients and layer transparency.Step 1
Use the Gradient (G) tool to apply a linear gradient to the left part of the arch and the back of the logo. Add another gradient to the logo’s edges.

Step 2
Select the upper part of the logo. Copy it (Ctrl+C Ctrl+F) and fill it with yellow color. Copy the object again and fill it with red color. Use the Direct Selection (A) tool to select a bottom point of the arch. Shift it up by pressing the arrow key once. Select the red and yellow objects and click Minus Front in the Pathfinder tab.

Step 3
Do the same with the edge to achieve a beveled effect.


Step 4
Fill the beveled edges with a transparent gradient as shown in the image below. Apply the gradient all along the bevel.

5. Add reflections and flares.
To make the logo look more realistic, apply reflections and flares.Step 1
Create two copies of the upper part of the logo. Fill the new figures with red and yellow colors.
Shift the upper figure three moves to the left, keeping the Shift button pressed. Select the two figures and click Minus Front in the Pathfinder tab.
Use the Gradient (G) tool to apply a gradient from white with 50% opacity to white with 0% opacity.

Step 2
Create flares for the upper and lower parts of the logo as described in Step 1.

Step 3
Copy the upper part of the logo. Use the Pen (P) tool to draw a curve crossing the object.
Select the curve and the object. Click Divide in the Pathfinder tab. Ungroup the objects (Object>Ungroup) and remove the excess parts. Apply a white gradient with 50% opacity to the object.

Step 4
Create two copies of the object from the previous step. Fill the new objects with yellow and red colors. Use the Pen (P) tool to create an additional pivot point as shown in the image below. Shift up the point.
Click Minus Front to create a flare. Fill it with white color and apply 50% opacity.

Step 5
Repeat the steps shown below to add another reflection to the upper and lower parts of the logo.

6. Add the finishing touches.
Step 1Select the entire logo and group it (Ctrl+G). Copy the group (Ctrl+F). Reflect the copy vertically and horizontally (Object>Transform>Reflect). Arrange the two groups as shown in the image below. Group all the objects.

Step 2
Use the Rectangle (M) tool to create a background. Draw a rectangle (800x600px) and fill it with dark blue color. Shift the rectangle to the back. Align the rectangle and the logo with the center.

Comments
Post a Comment